My Second Laurel!

Posted by Kristin on Sunday, April 28, 2013.
4 Comments

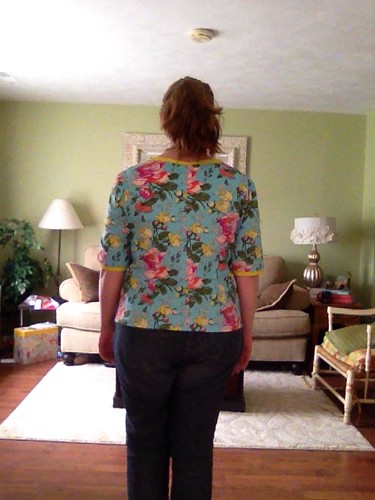
I have a list of projects that I want to create, and while searching for dress fabrics I ran across Amy Butler's "Sketchbook Spring".  It was love at first sight.  But I was afraid it would be a bit too busy for a dress and decided to use it for another Colette Laurel.  This time I made version four, the top.  What's nice about the top is there is no zipper!  Woo hoo!  I'm still not brave (or patient) enough to create my own bias tape so I found this wonderful citron-y color that really pops against the turquoise background.


Laurel Top Front
Laurel Top Back


And as usual, my pictures look like they were taken by a drunk monkey. I don't know how they ended up all slanty. You would think an artist/seamstress/creator would have a teensy weensy bit of photography talent. Nope. Not here. And every spot of my house is full of stuff...so there isn't a room with a background that isn't busy. 

I have a few more finished projects that I have to get into posts, but right now I am taking a small break from sewing.  I seem to have developed some painful arthritic-like symptoms in my hands and wrists.  Therefore I am giving them a rest to see if the swelling, stiffness, and pain decreases.  If not, I'm going to ask my doctor for a skeleton transplant....


Colette Laurel Dress

Posted by Kristin on Sunday, April 14, 2013.
11 Comments

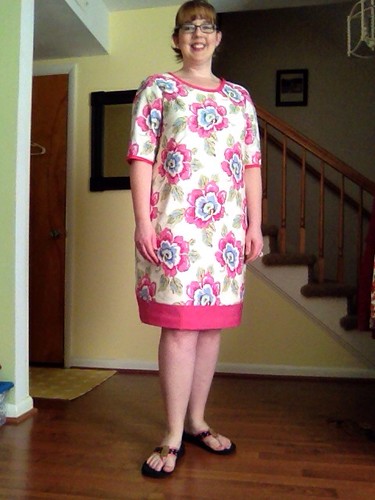
I just finished my second Colette Pattern, the Laurel dress!

The Laurel is a simple (probably to others) shift dress.  Not necessarily the best dress shape for someone with (ahem) curves, but one of the most comfortable.  You will not see a picture of me from the side in this dress.  There is a not very skinny reason for that....but I will proudly wear it out and about!

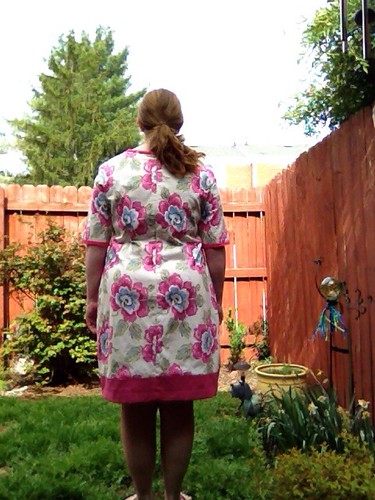
I used Amy Butler's "Wild Poppies" that I ordered from Cotton Blossom Farm.  If you need beautiful fabrics FAST, order from Cotton Blossom Farm (www.cottonblossomfarm.com).  Love them!  I added a solid pink band around the hem to add length and just for the fun of it.  Since the fabric was a little see through, I also used an inexpensive lining I found at JoAnn's.  And it works because you can't tell that I am wearing my black zebra striped bra underneath.  But I just told you, so kinda defeats the purpose now.  Moving along....

I also made the front neckline a bit lower.  I feel like it makes me look more svelte.  I know, you thought I looked just like Heidi Klum with my lower neckline.  See what a little altering can do?

I had never set in a sleeve before, and sort of missed the part of the instructions where you are supposed to baste it in first before sewing.  There is a reason for that.  I found out the hard way as I pulled out a nice tight sleeve seam that I had accidentally attached up by the neckline.  Don't ask me how that happened.  But, if I had basted first like the directions said, it might have been a little easier to pull out.  *Note to self...as a somewhat beginner to sewing - follow all the directions!!!

I do love the fabric and have ordered another Amy Butler print (from Cotton Blossom Farm!  You would think they were paying me...or had a clue as to who I am) for the shirt version of the Laurel.  My goal is to have that done before my college reunion this upcoming Saturday.  And I'll keep my lower neckline...I don't want people to actually realize I've put on 50 pounds since I graduated.  And the neckline will hide that, right?

Colette Laurel front (with an angry Phoebe!)
Colette Laurel front
Colette Laurel back
Oh, and the picture taking disclaimer:  I finally found a time delay app so I took all of these using my iPad.  I tried outside, but the sun wasn't cooperative.  So I moved inside.  And couldn't find one part of my house that I wouldn't mind people seeing.  I think I took over 25 pictures in order to find three worth posting. Well, two really...I just threw the shot of me and Phoebe in because she was royally pissed that I was holding her and I find anytime I make her mad hilarious.   I really need a photographer at my beck and call. 

My first (and probably last) attempt at reupholstery

Posted by Kristin on Friday, April 5, 2013.
6 Comments

I have done some simple reupholstering projects...such as ottomans and chair seats...nothing too hard.  And I think anyone can tackle these with some fabric and a staple gun.

Then I saw a chair out by the curb for trash pickup and started to wonder if I could possibly redo an entire chair.  I stealthily dragged the chair across the yard and driveway and wrangled it to my back porch.  Wasn't it a beauty?
I began the task of taking the chair apart.  It is a wonder I didn't require a tetanus shot...

A good crafting blogger would write a tutorial from this point on.  I'm not a good crafting blogger.  I still don't think I know enough to tell anyone else how to do this.  Plus I'm sure I did most of it wrong (such as retying a couple springs with kitchen twine).  If it weren't for the help of the two ladies at Bargain Barn Fabrics in Montvale, VA, this chair would have never gotten past this point.  I was down there three times asking questions and buying more supplies.  A smart woman would have just let them redo the chair.  I'm not a smart woman.

After I stripped the chair of its ugliness, I repainted it a fresh aqua blue.  I retied some springs, covered those in jute webbing, stapled the burlap back, and then covered my seat in dacron.  It looks better already!


 This chair project required covering the seat, making a cushion with cord around the edges, using tufting in the back, and attaching the back fabric using flexible metal tack strips.  The cushion was easy to do, but it frustrated me that the medallion design was not evenly spaced across the fabric so I couldn't line up the top and bottom pieces perfectly.  The tufting wasn't hard, but I still didn't manage to get all my buttons tight enough.  The flexible metal tack strip that went along the top of the curved back was a little like wrestling Jaws.  But it is on there!

I love how it turned out, but I can't find a home for it.  It didn't go with the living room (too blue), so I moved it to my bedroom.  I still think it looks a little out of place, but I'll live with it for a while before I find it the right spot.


Inspirational Card Deck Swap...

Posted by Kristin on Thursday, April 4, 2013.
2 Comments

....or learning to let go

In January, in a spurt of crazy, I signed up to participate in Jessica Brogan's Inspirational Card Deck Swap.  To participate, all I had to do was take a deck of cards and alter them in some creative way and include an inspirational quote on each one.  I would mail my completed deck to Jessica and she would mix them all up and I would receive a deck of cards created by 52 different artists (and 52 different wonderful souls would receive my cards as part of their decks).  I thought I could do this.  How hard could decorating small cards be?  Especially when given almost three months to do it in.

It was hard.  I procrastinated because I couldn't figure out what to do with my cards.  On the day they were due to be postmarked, I sat down to begin.  And it was a disaster.  I covered all my cards in paper, adhering it to the cards using an aerosol glue.  Since it was cold outside (and dark) I did this on my kitchen table.  Which is extremely close to my gas furnace.  After I sprayed everything down, I read the warnings on the can that told me in no uncertain terms that I would blow myself up if used near any sort of flame, including small pilot lights.  Luckily, I'm still here but I switched to a permanent craft glue stick just to be safe.

Then I started to paint.  I thought every card had to be its own little painting.  So as I created my little not-quite-masterpieces, all my paper that I had risked my life to glue down started to peel off.  Completely.  so now I had bare playing cards and curly sheets of paper covered in paint.

At this point I decided to quit.  My paintings weren't good enough to give to others.  My paper was falling off.  I was at the deadline.  So I messaged Jessica trying to drop out.  Gluing paper to playing cards was obviously beyond my skill set and I was too embarrassed to send these to anyone but the garbage men. 

But she wouldn't let me.  She gave me advice on how to glue my paper down (double sided tape) and offered to help me through the process.  I finally found out about her tutorial video and I watched that.  And I learned that I needed to let go.  I needed to let go of aiming for perfection and then getting upset when I didn't reach it.  I needed to let go of worrying what others would think of my cards.  So I let go.  And every card I created after that turned out beautifully.  I gave up on trying to create mini paintings and instead covered every single card in yellow paint.  I then used torn paper and stamps to create my inspirational cards.  And I love them all.

Here is my process...

These are my first few cards.  I had envisioned a sky and sea life themed set.  This didn't get that far after every single card fell apart and this is where I tried to quit.


I then switched to color pencil.  If there wasn't any wet paint to ruin my glue, I thought everything would stay together.  It did stay together.  But want to know what takes a very, very, very long time?  Coloring close to 50 individual pictures with pencil.  I gave up after five. 


This is my Janet Hill inspired set.  Visit her works at www.janethillstudio.com.  All of her paintings have a sense of vintage whimsy.  So I did dresses on dress forms.  This was pretty easy but I ran out of dress ideas.  So I quit after five here as well.


Here is my last ditch effort.  At this point I didn't care.  I still wanted them to be pretty, but I gave up on trying to form perfect little pictures.  And this is also when it all clicked and came together....


I will be mailing my cards off after all.  And I can't wait to see what I receive! 

And a huge thank you to Jessica who helped me through this process by being supportive and reminding us all to just let go....

My first ever pattern review!!!!

Posted by Kristin on Wednesday, April 3, 2013.
2 Comments

Burda Style 06/2011 Skirt with front pleats #117A

Welcome to my first pattern review!  I've noticed that most pattern reviews have for real pictures, and not poorly lit cell phone pictures of clothing hanging on a door.  So I had to wait until I could con someone into taking my picture (thank you Kelly!). 

I had gorgeous gray silky fabric covered in black lace.  I bought a tiny bit to make a clutch for my sister's wedding back in January and put the leftovers away.  But I kept thinking about it....I wasn't happy with just a clutch.  A broken clutch (hint: super glue will NOT hold fabric to a metal frame...).  I first thought of a lace panel front pencil skirt, but my curves aren't very pencil-y.  So then I started thinking pleats and ran across a pleated skirt sew along that Gertie did for this Burda pattern. 

You can check out the skirt and the sew along here.

According to Gertie, this was a super simple skirt to put together and the pleats could easily become a contrast fabric.  I immediately downloaded the pattern and rushed out to buy some solid black fabric.  I ended up with a silk dupioni from JoAnn's.

I think it turned out pretty well!  I'll get into the details shortly, but the skirt is extremely comfortable and I love it.


Please ignore my super white legs, but feel free to admire my hair.  I actually did something to it for my photo shoot in my mom's sunroom.  I don't even fix my hair for work.  Or my boyfriend.  But I did it for you, dear readers.

Ok, now for the review!

Pattern Description
This is a skirt with two pleats in the front and two in the back.  There is a side zipper and the waistband is grosgrain ribbon.

Pattern Envelope
I downloaded it from Burda Style so I don't have an envelope.  But the pattern picture shows an extremely thin model in a see through skirt.  I didn't opt for the sheer white fabric.  No one wants to see that.


Pattern Sizing
Ha!  Apparently I am "Extremely Plus Sized and Therefore Not Suitable for Normal Burda Patterns".  I had to grade the pattern up by 3 sizes.  Three!  This is the first time I've ever enlarged a pattern so I did make a muslin.  Fortunately, this pattern is almost all straight lines, so it was extremely easy to do.

Did it look like the pattern envelope once you were done sewing it?
I think so.  Except for the see through part.  Hope it doesn't rain wherever she is.  I did hem mine a little lower, but the pattern comes in short and drag the floor long.  I went in the middle.

Were the instructions easy to follow?
I have no idea.  I never touched them.  I used Gertie's old sew along instructions and it went together like a breeze.  I would assume that her instructions followed along with the pattern instructions.

What did you particularly like or dislike about the pattern?
I loved how easy it was to make my size and how smoothly it went together.  It is labeled as a "novice" pattern and it really is. 

Would you use it again or recommend it to others?
Yes and yes!  I already have the fabric for skirt number two using this pattern.  I got a white fabric covered in lobsters for summer.  I plan to wear it out to eat at Red Lobster while singing the B-52's "Rock Lobster".  Good plan, huh?

Conclusion
Love the pattern, but I might need to rethink some of my future fabric choices.  Nah, no I don't.  I've already bought the lobsters!


LinkWithin